NASA Says SLS Program Costs are ‘Unsustainable’

For years, journalists, space nerds and government oversight groups alike have talked about the staggering costs associated with the SLS program, which is the agency’s new moon rocket. As Eric Berger reports, NASA has finally gotten the message:

In a new report, the federal department charged with analyzing how efficiently US taxpayer dollars are spent, the Government Accountability Office, says NASA lacks transparency on the true costs of its Space Launch System rocket program.

Published on Thursday, the new report (see .pdf) examines the billions of dollars spent by NASA on development of the massive rocket, which made a successful debut launch in late 2022 with the Artemis I mission. Surprisingly, as part of the reporting process, NASA officials admitted the rocket was too expensive to support its lunar exploration efforts as part of the Artemis program.

“Senior NASA officials told GAO that at current cost levels, the SLS program is unaffordable,” the new report states.

Eric quotes the juiciest parts in his article, but the report’s message is loud and clear: the SLS program cannot continue as it has for the last decade if NASA wants to use this launch vehicle to power future missions to the moon and beyond. Of course, with the agency’s direction and budget set by Congress, fixing this problem isn’t going to be easy.

Federico Viticci: ‘I Used a Game Boy Camera for FaceTime Video Calls in iPadOS 17’

Last night, Federico sent a wild-looking screenshot to the Connected iMessage thread and I urged him to blog about it.

Ticci on a Game Boy Camera on an iPad

Thankfully, he did:

I have an Analogue Pocket, which is an outstanding modern take on the Game Boy that can play original Game Boy cartridges. I also have the Analogue Pocket dock, which lets me play Game Boy games on a big screen by taking advantage of the Pocket’s excellent upscaling mode for Game Boy graphics. And, of course, Nintendo made everyone’s favorite camera from the late 90s, which you can get pretty cheap these days on eBay. If I could use the Game Boy Camera on a Pocket and send the video feed from the console to the iPad Pro, would I then be able to do a FaceTime call with someone while looking like a character straight out of a Game Boy game?

The answer, my dear readers, is a glorious, resounding Yes.

The Secret Life of Early 2006 to Early 2009 iMacs

Over at LowEndMac, Mark Sokolovsky has documented a wild upgrade to white plastic Intel iMacs:

A little known secret is hidden inside every early intel iMac made by Apple prior to their 21.5″/27″ transition… they all have a Mini-PCIe slot! While many upgrades have been documented/discovered for these iMacs, and GPU upgrades have been attempted as well, few eGPU solutions have been presented as viable, or have been documented.

In this article today, the examples we’ll be using are my 2007 20″ iMac, as well a 20″ Early 2006 iMac. The ’07 iMac had been upgraded to sport an AMD XFX RX 570, with full graphical hardware acceleration, under macOS Monterey! The theme here is promoting the longevity of devices deemed otherwise obsolete. Whether or not a device is obsolete is subjective, and this opinion lies with us.

St. Jude Livestream: Building LEGO’s NASA Mars Rover Perseverance

As part of Relay’s on-going fundraiser for St. Jude, I’ll be streaming again this weekend. This time, I’ll be building LEGO’s new Mars Rover (Model 42158). I am very pumped about it.

Join me on Saturday, September 9:

  • ???????? – 10:00 AM Pacific
  • ???????? – 12:00 PM Central
  • ???????? – 1:00 PM Eastern
  • ???????? – 6:00 PM BST
  • ???????? – 7:00 PM CET
  • ???? – Wherever You Live

Kbase Article of the Week: Using a Camera cover, Palm Rest, or Keyboard Cover on a Mac notebook

Apple Support:

If you use a camera cover, palm rest cover, or keyboard cover with your Mac notebook, remove the cover before closing your display to prevent damage to your display.

To enable the thin design of Mac notebook computers, the clearance between the display (screen) and the top case is engineered to tight tolerances. If you use a camera cover, palm rest cover, or keyboard cover with your Mac notebook, remove the cover before closing your display. Leaving any material on your display, keyboard, or palm rest might interfere with the display when it’s closed and cause damage to your display.

Sponsor: Magic Lasso Adblock: YouTube Ad Blocker for Safari

Do you want to block all YouTube ads in Safari on your iPhone, iPad and Mac?

Then download Magic Lasso Adblock – the ad blocker designed for you.

Magic Lasso for YouTube

It’s easy to setup, doubles the speed at which Safari loads and now blocks all YouTube ads.
Magic Lasso is an efficient, high performance and native Safari ad blocker. With over 4,000 five star reviews; it’s simply the best ad blocker for your iPhone, iPad and Mac.

It blocks all intrusive ads, trackers and annoyances – letting you experience a faster, cleaner and more secure web browsing experience.

The app also blocks over 10 types of YouTube ads, including all:

  • video ads
  • pop up banner ads.
  • search ads
  • plus many more

And unlike some other ad blockers, Magic Lasso Adblock respects your privacy, doesn’t accept payment from advertisers and is 100% supported by its community of users.

Join over 280,000 users and download Magic Lasso Adblock from the App Store, Mac App Store or via the Magic Lasso website.

How to Set up Time Machine Server in macOS Ventura or Later

Note: This is an updated version of an article from 2018.


With macOS, Apple makes it easy to set up a drive to be a target for other Macs to use with Time Machine.

Say you have a Mac mini on your network, and a MacBook Pro. You can hook up an external drive to that Mac mini, and within a few minutes, be backing your MacBook Pro up across your network using Time Machine.

Here’s how to do it.

1. Prepare Time Machine Drive

Once your drive is plugged in, open Disk Utility and format it as APFS. For this article, the drive I set up is named “Remote TM.”

2. Share the Drive Using System Preferences

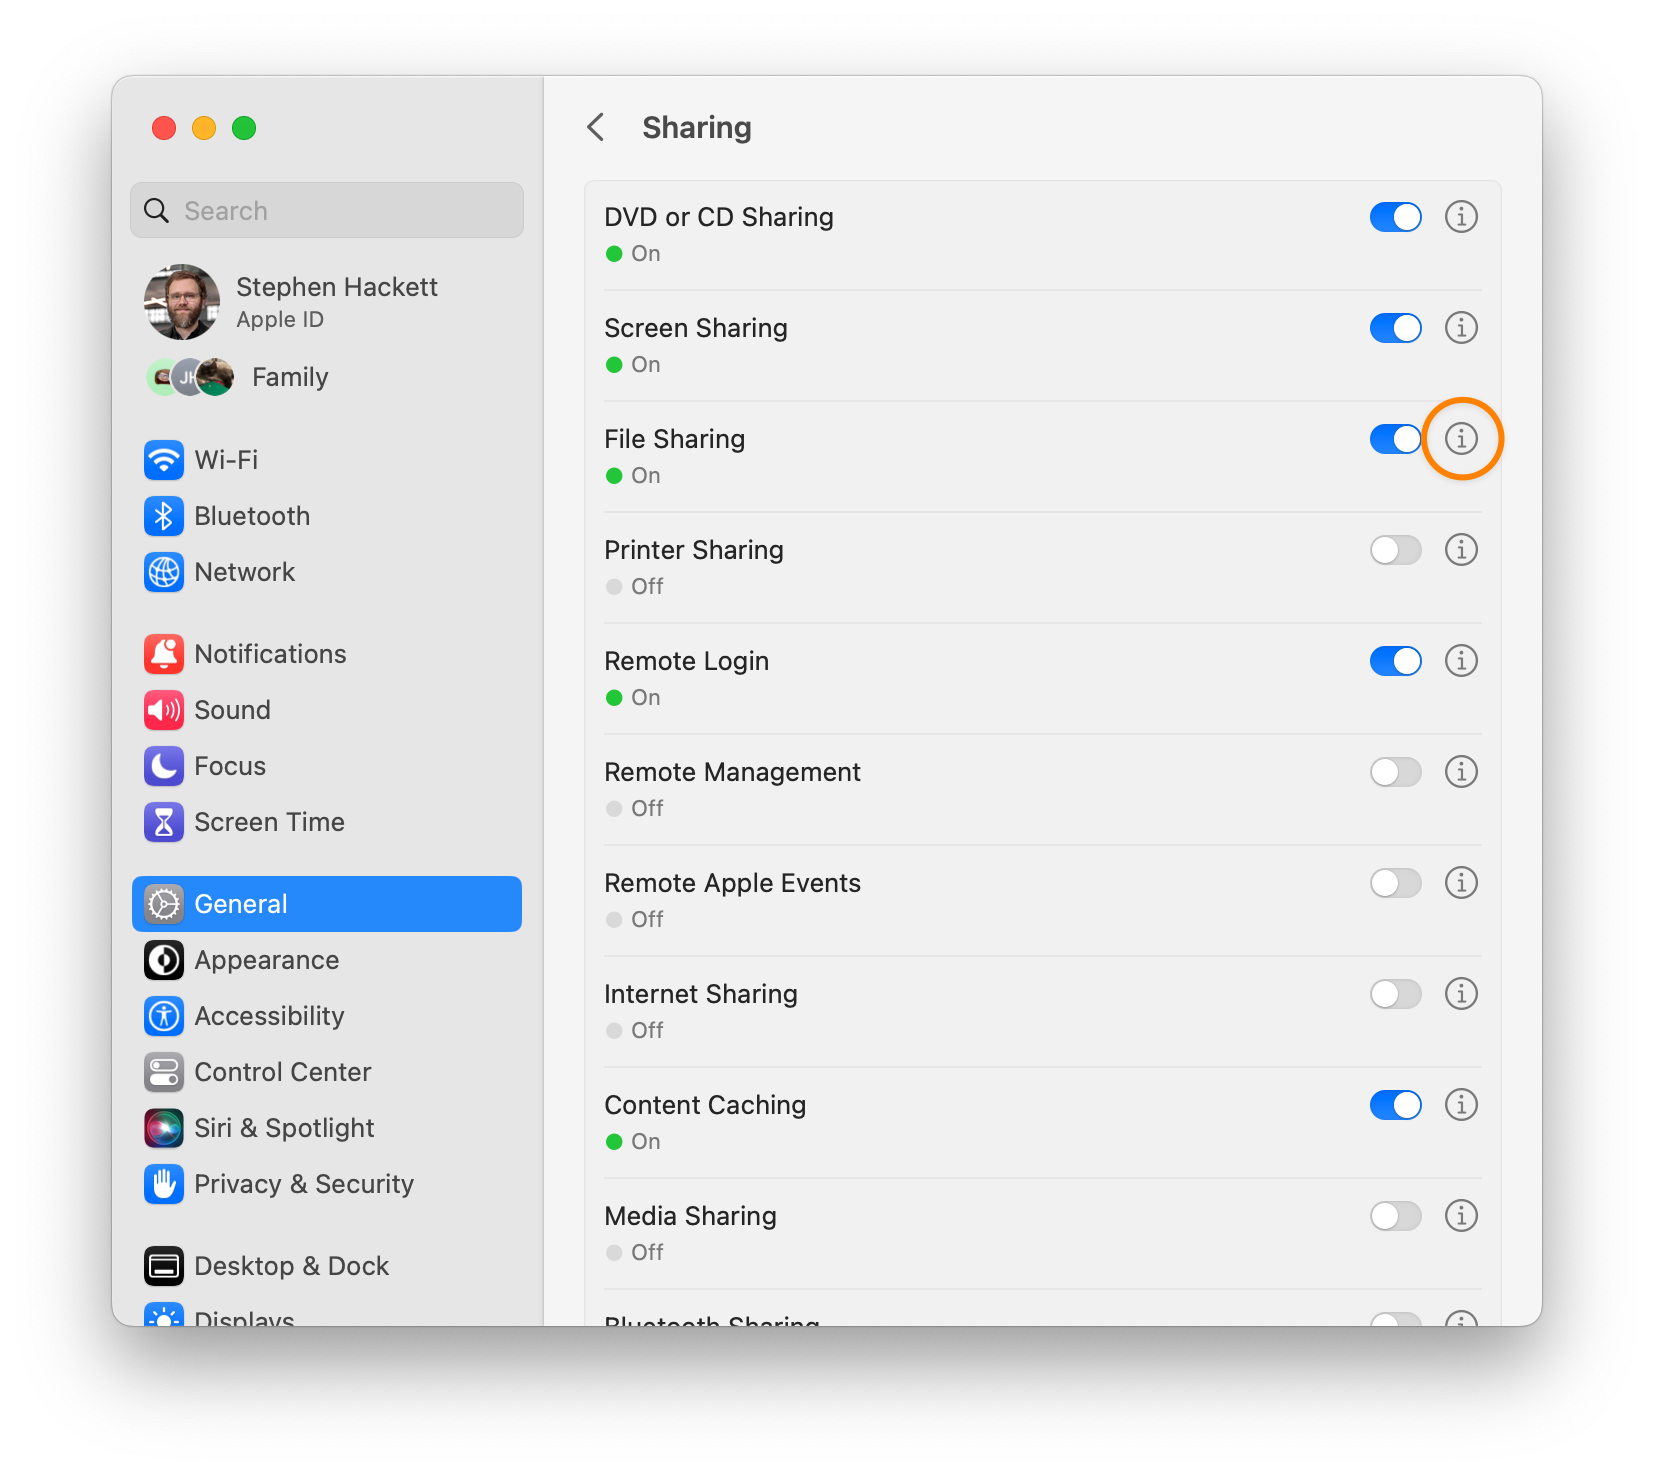
Once the drive is ready, navigate to the General section in System Settings, then navigate to the “Sharing” sub-section and turn it on with the slider.

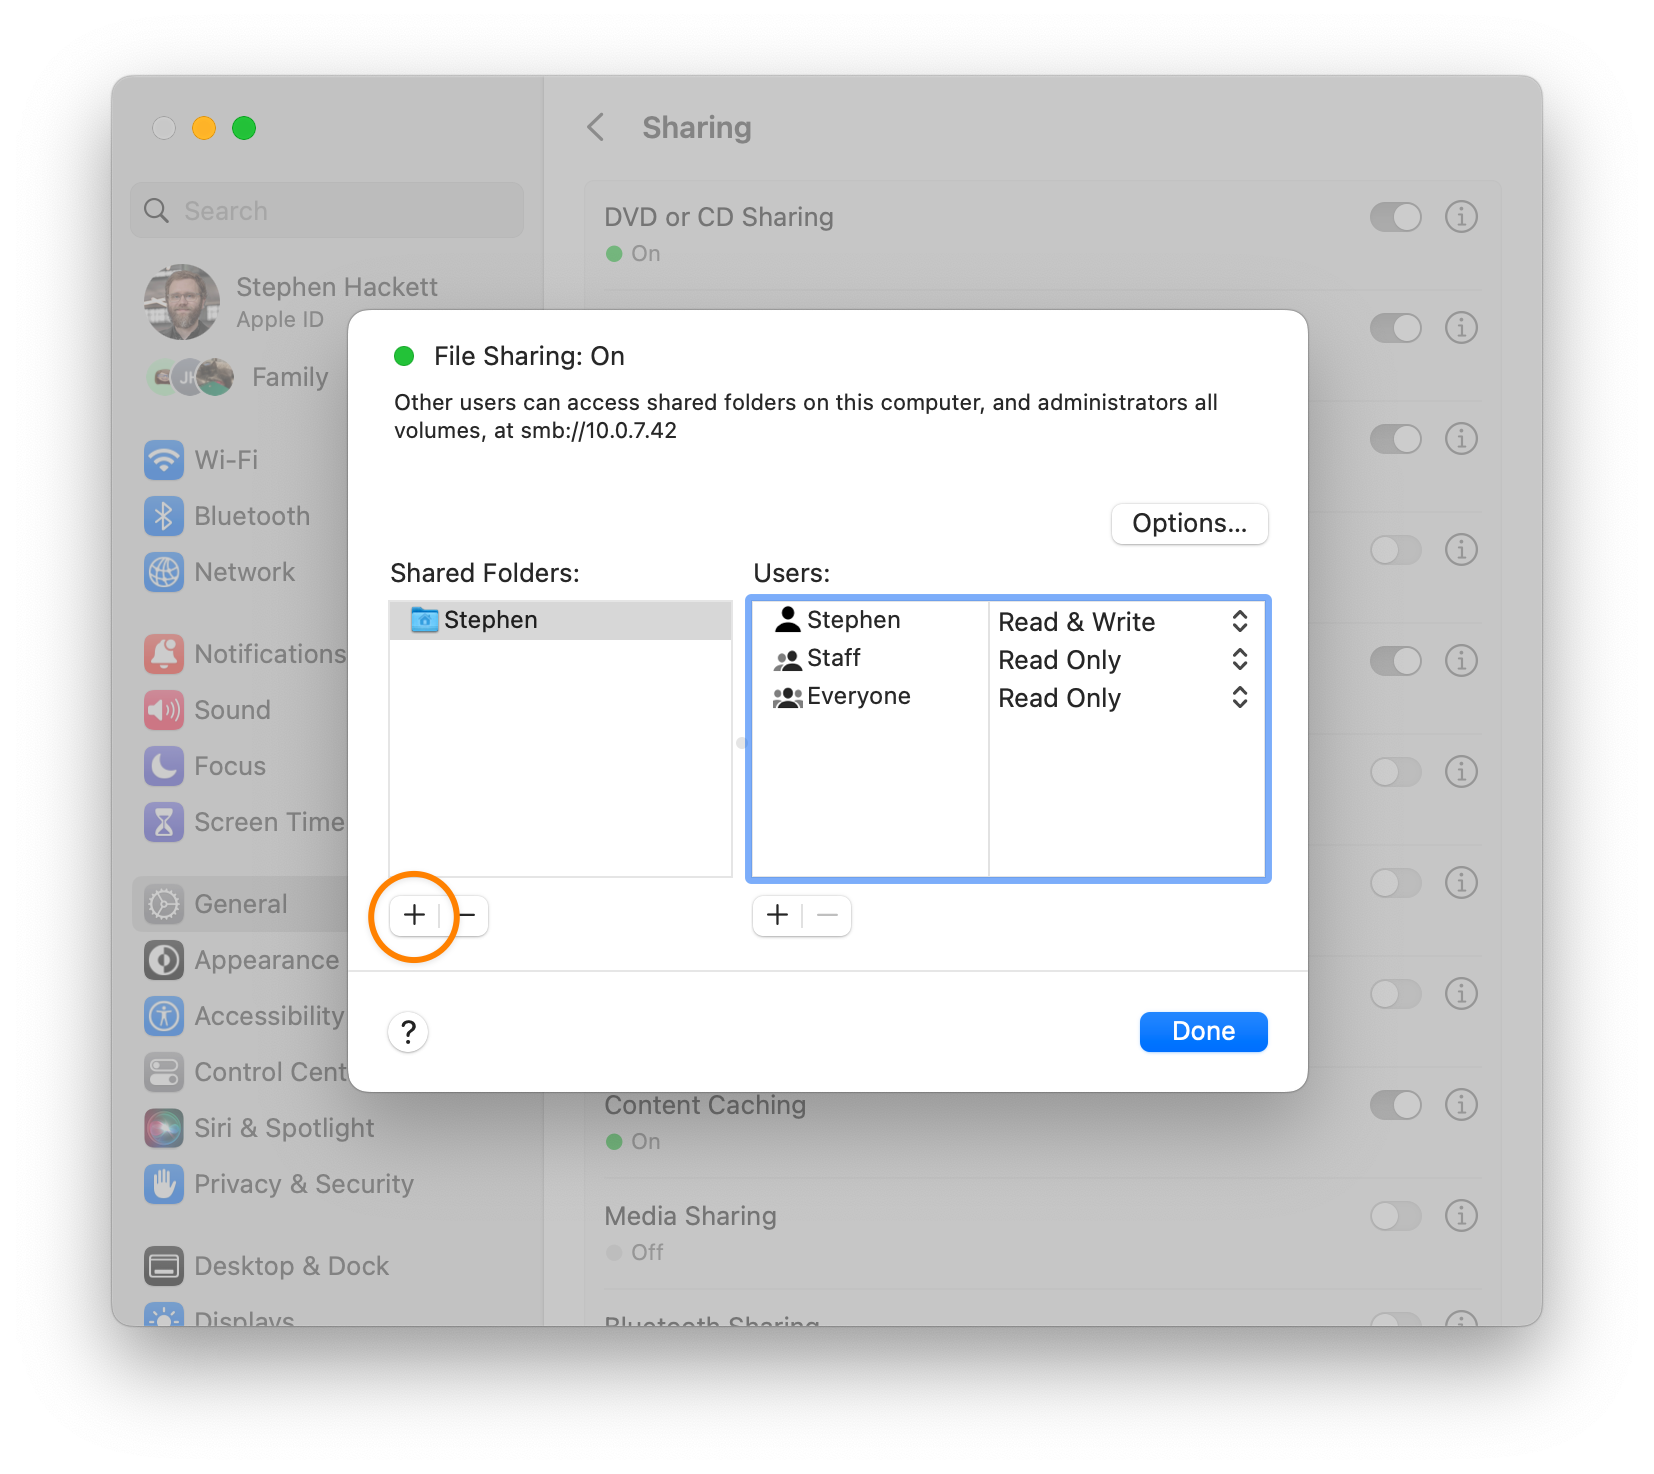
Then click on the small i button in the “File Sharing” section:

System Settings / General / Sharing

This will open a new pane. On this new pane, click the + button below the list of “Shared Folders:”

File Sharing Pane in System Settings

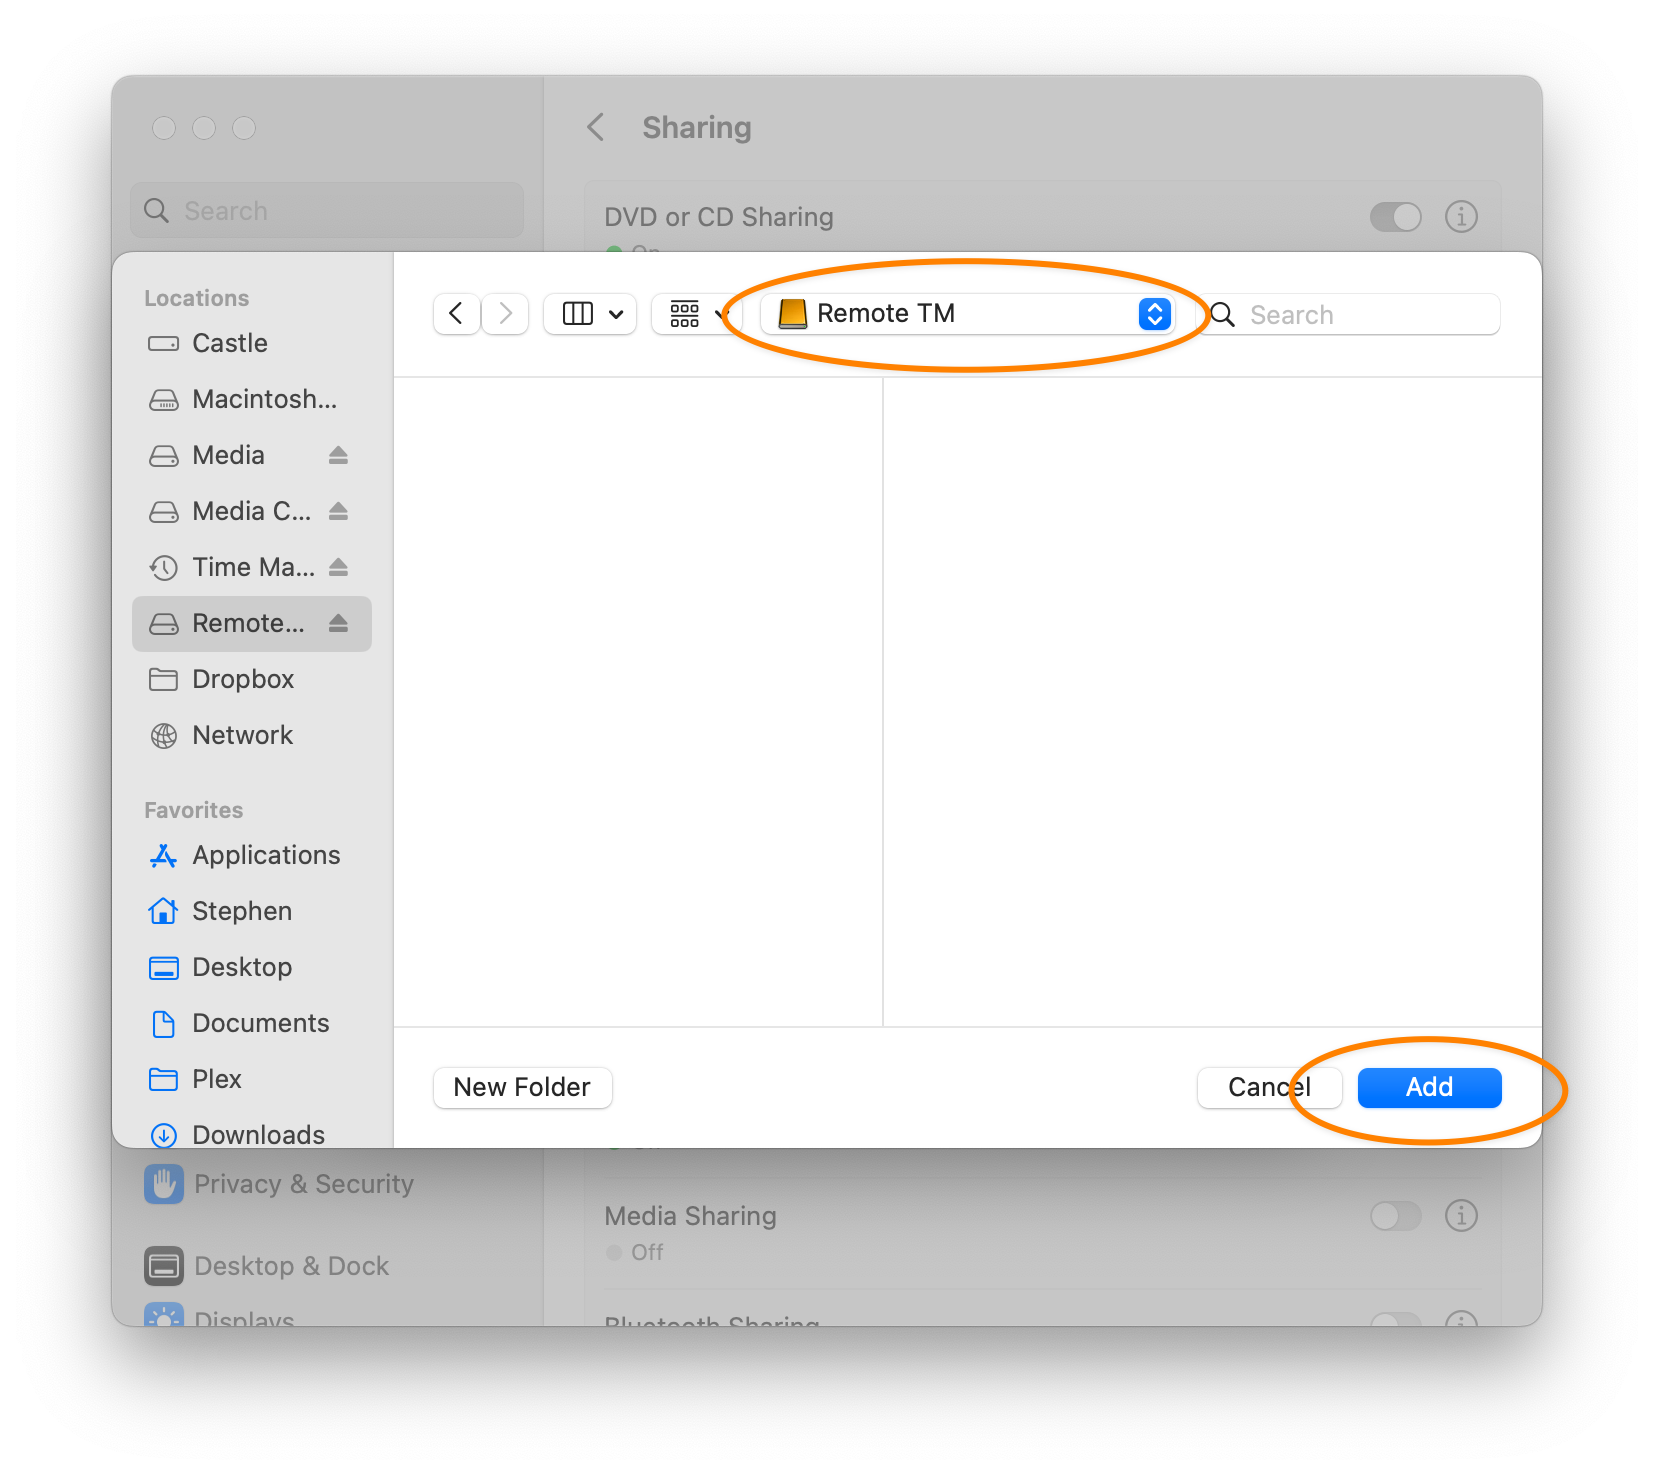
This will open a standard file picker window. Use it to navigate to the drive you have set up for remote Time Machine, then click “Add:”

Selecting the remote Time Machine drive

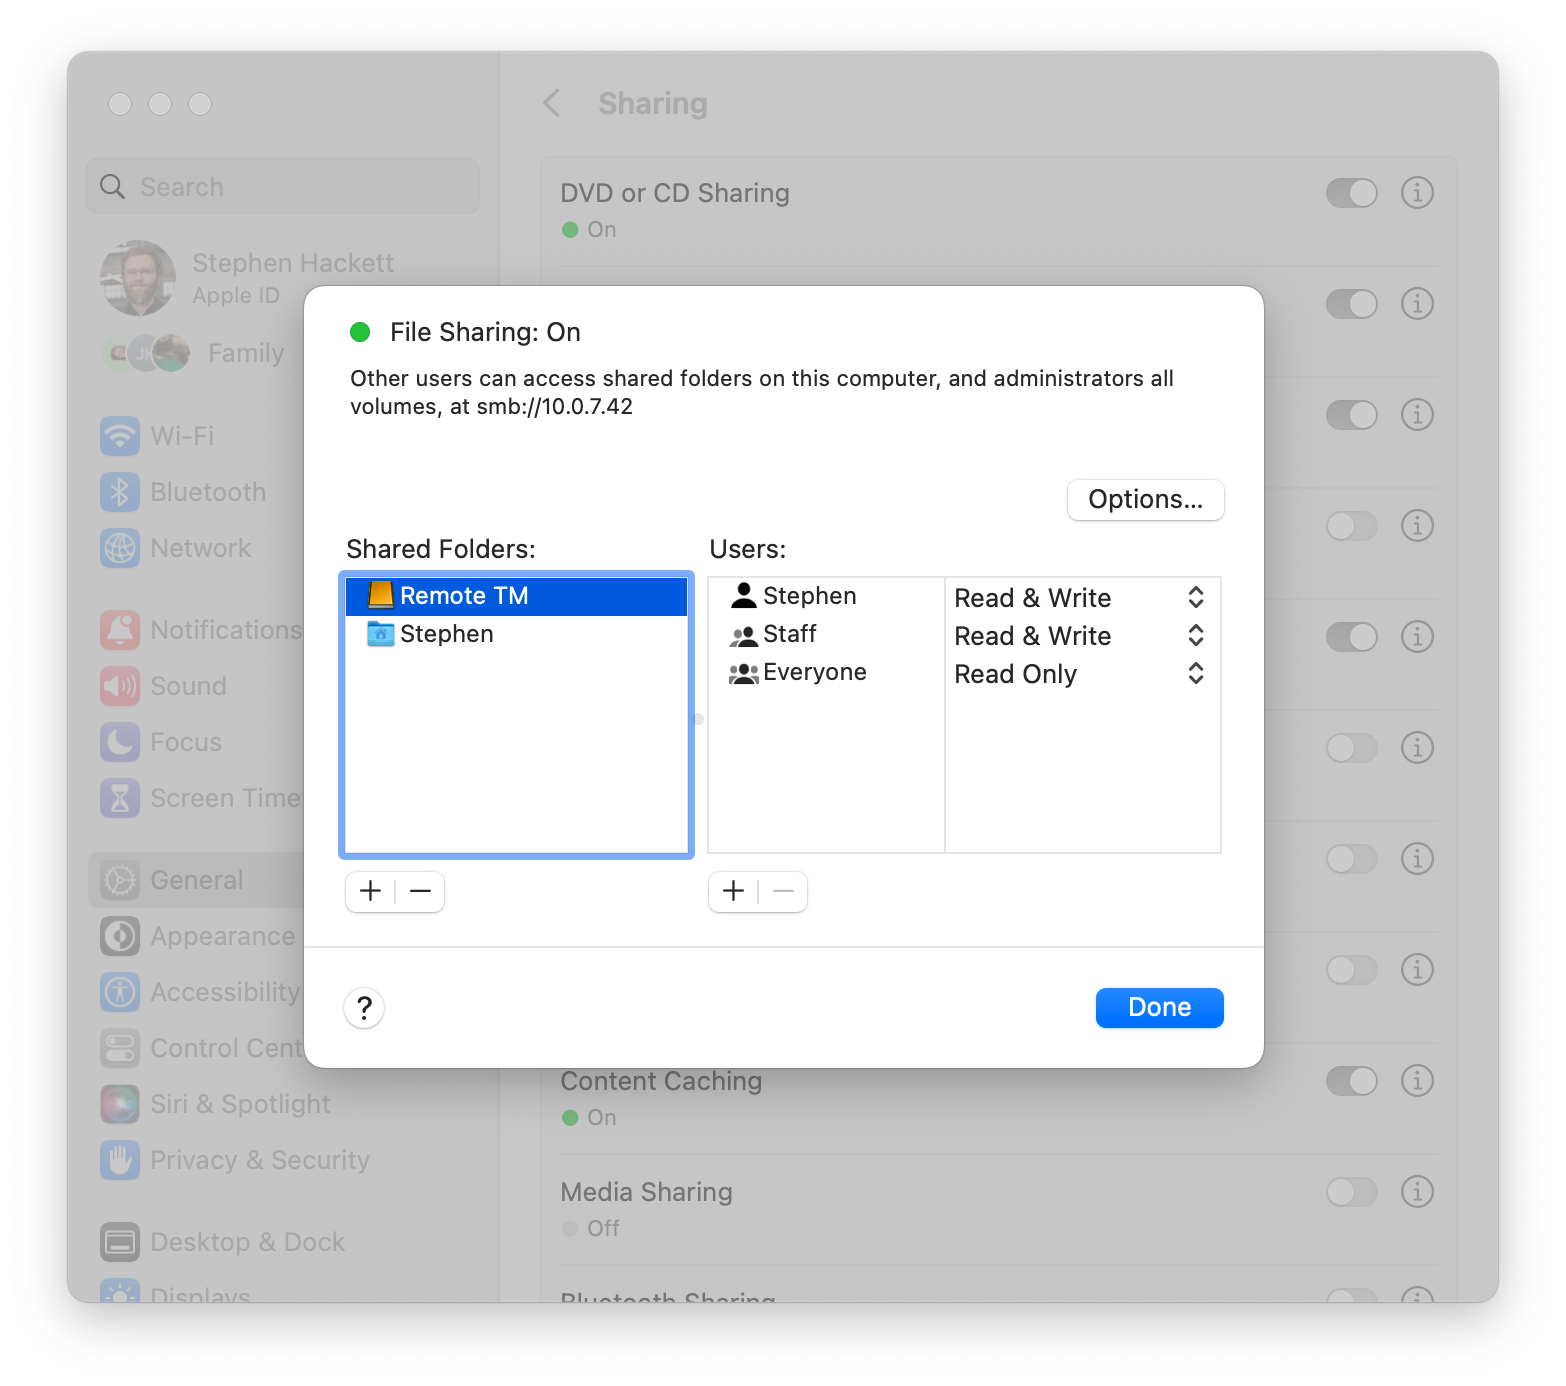
Once you do, you will be returned to the previous screen, but this time, your Time Machine drive will be listed:

Shared Remote Time Machine Drive

3. Set Up Drive as a Time Machine Destination

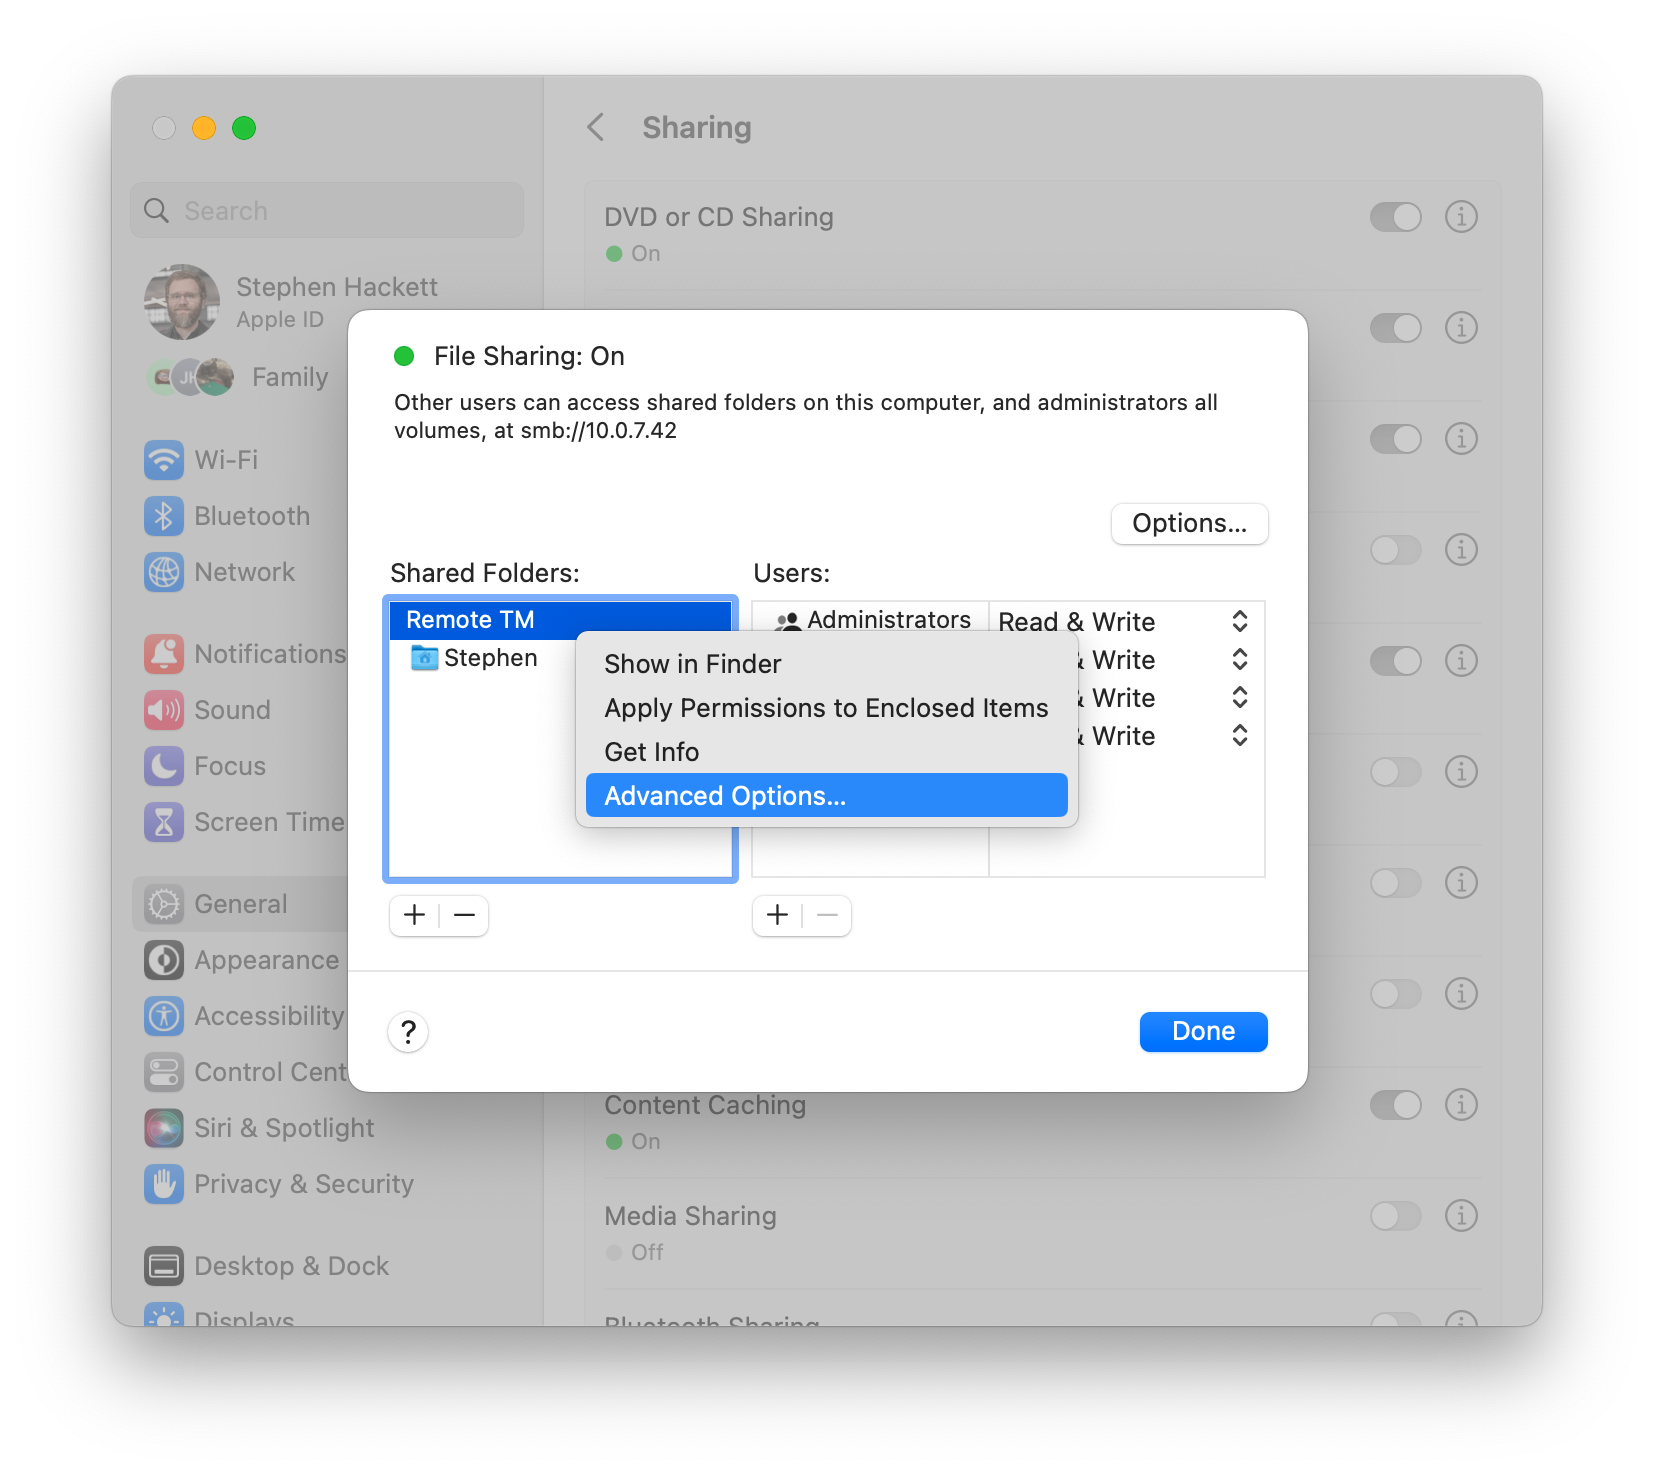
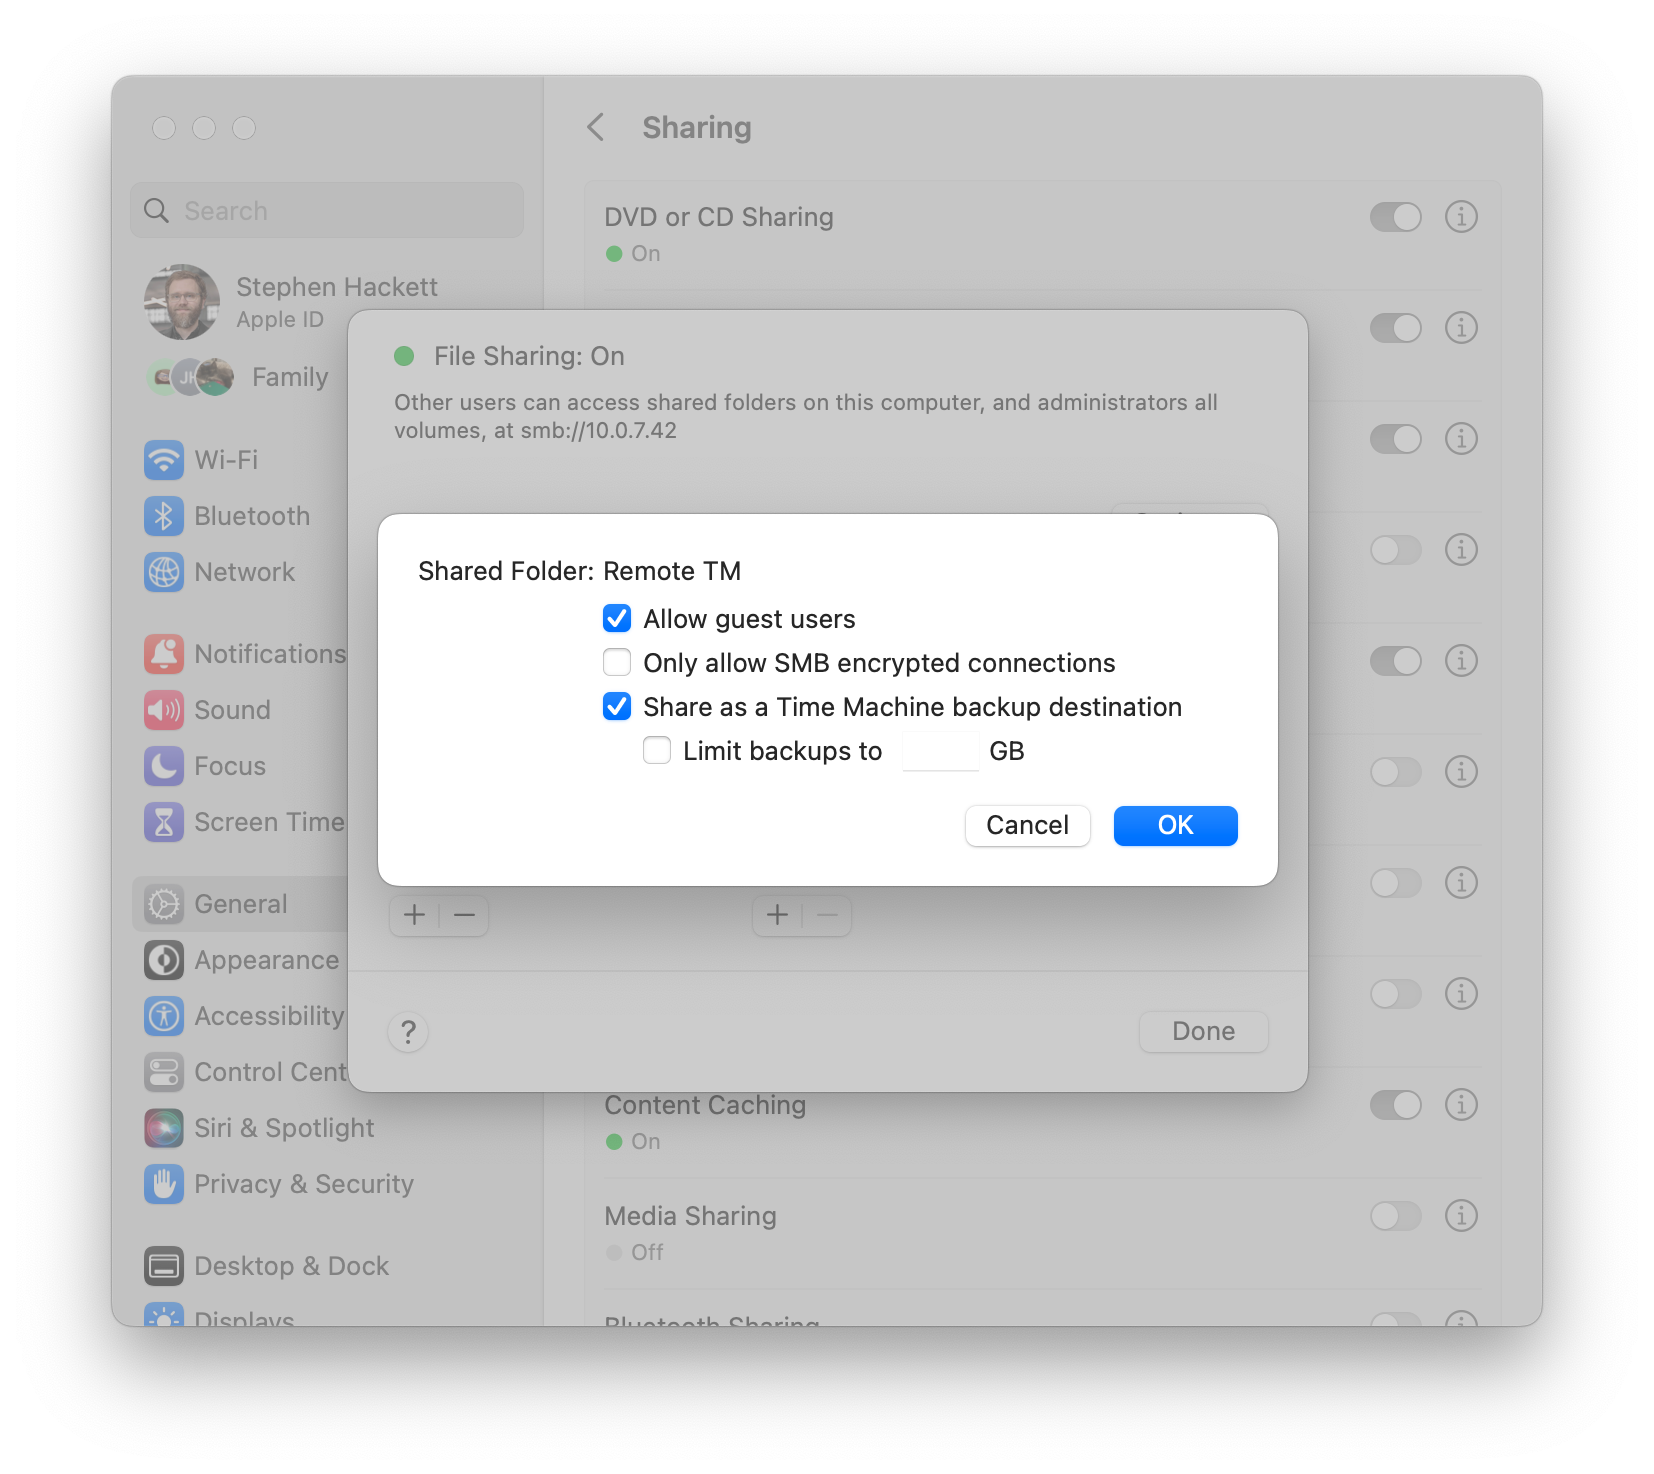
From the File Sharing pane pictured above, right-click on the drive in question and select “Advanced Options” from the menu:

Selecting "Advanced Options"

Doing so will open another new pane, that will let you tell macOS that the drive should be shared as a Time Machine backup destination. Select that option, and if desired, set a backup size limitation. This can be helpful if more than one user will be using this drive for Time Machine.

Setting Time Machine Options

Once you are done with this, save the changes and exit System Settings.

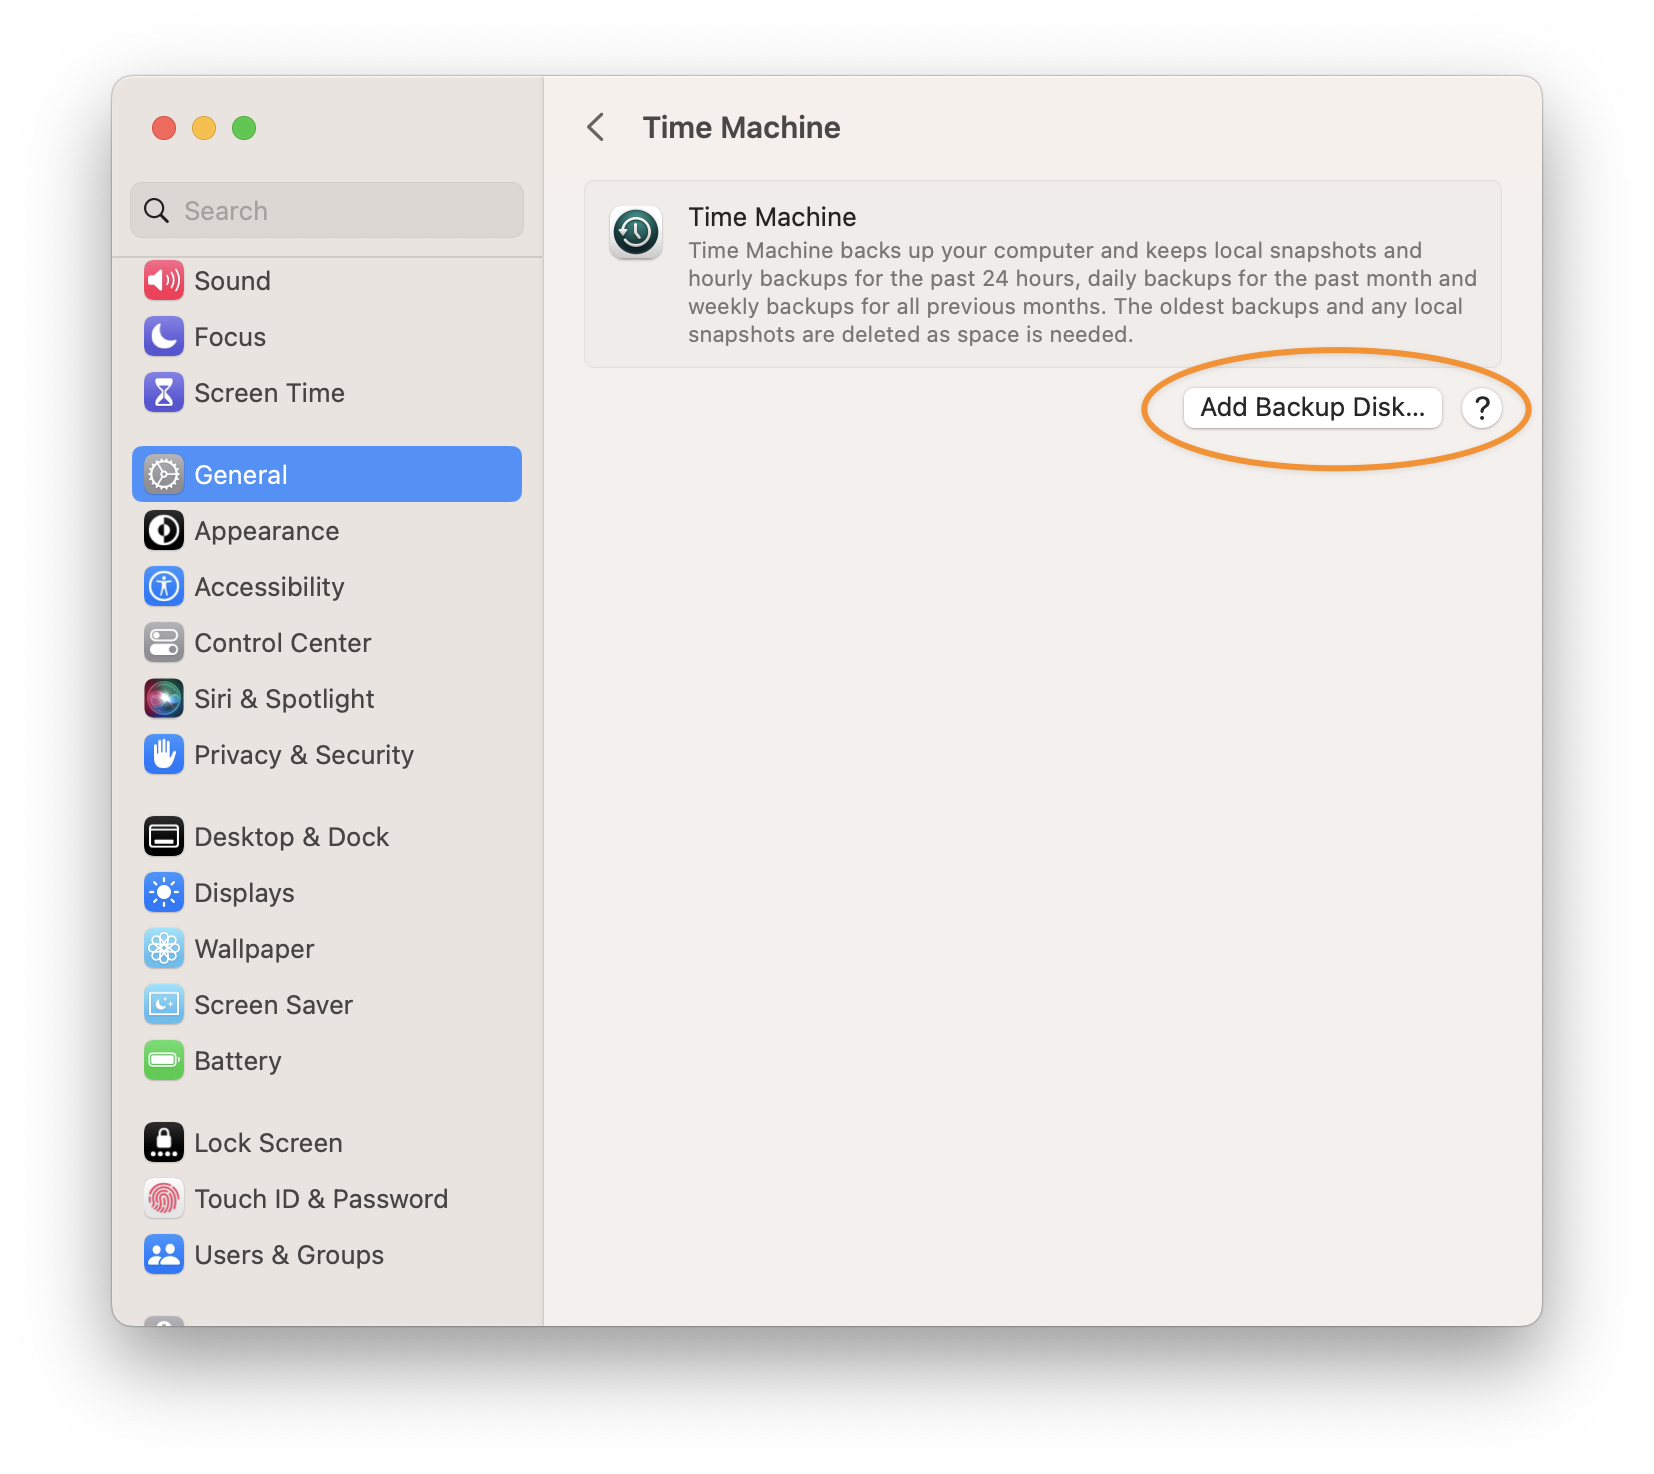
4. Add Folder as Time Machine Destination

Now go to a computer that will be using this drive for Time Machine. Navigate to the “Time Machine” section of the “General” pane in System Settings and select “Add Backup Disk…”

Add Backup Disk...

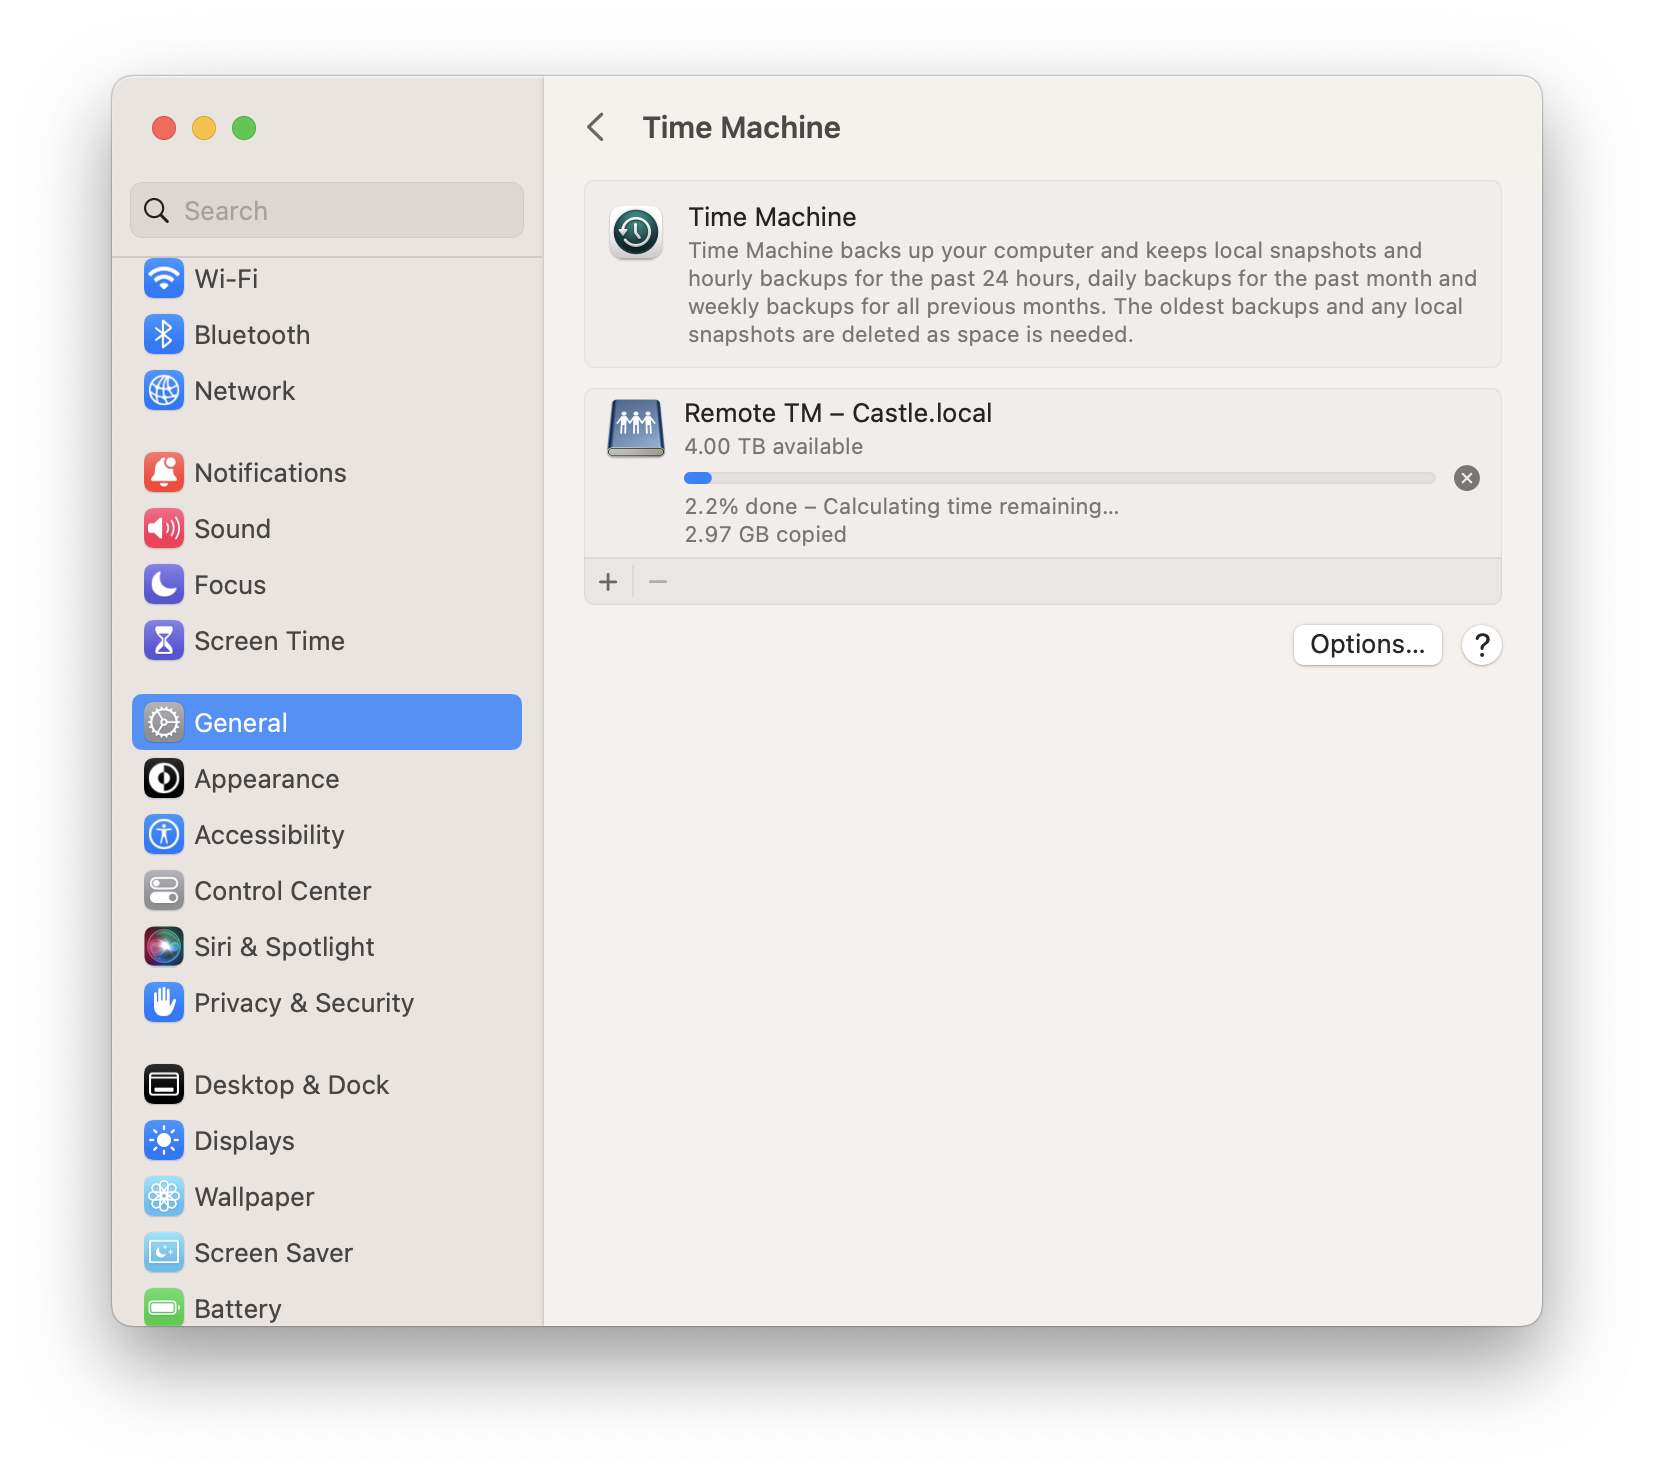
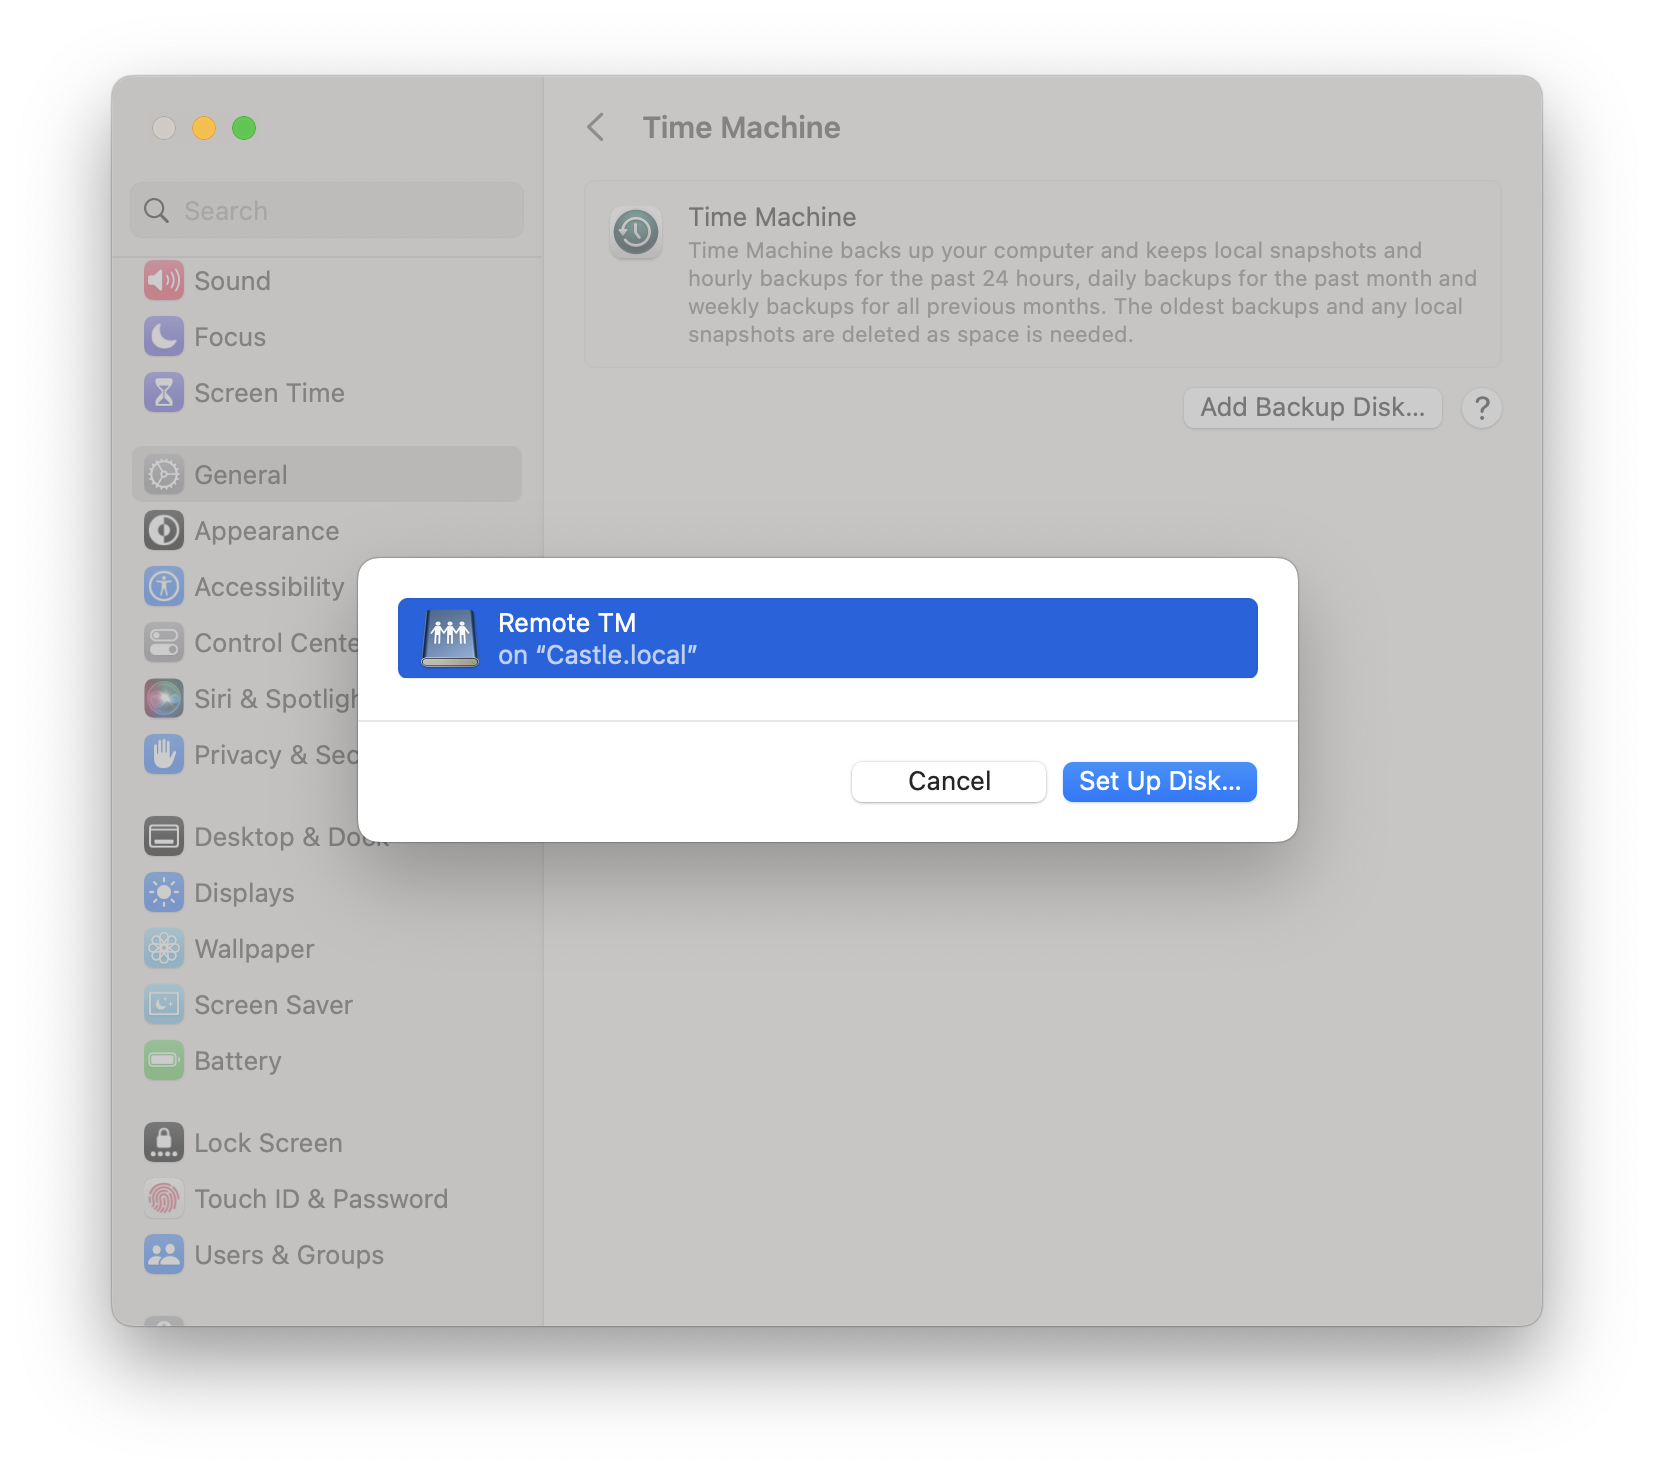
This Mac should automatically see your drive, assuming the two Macs are on the same network. Here, you can see my “Remote TM” drive as hosted on my Mac mini, which I named “Castle:”

Selecting the Time Machine Drive

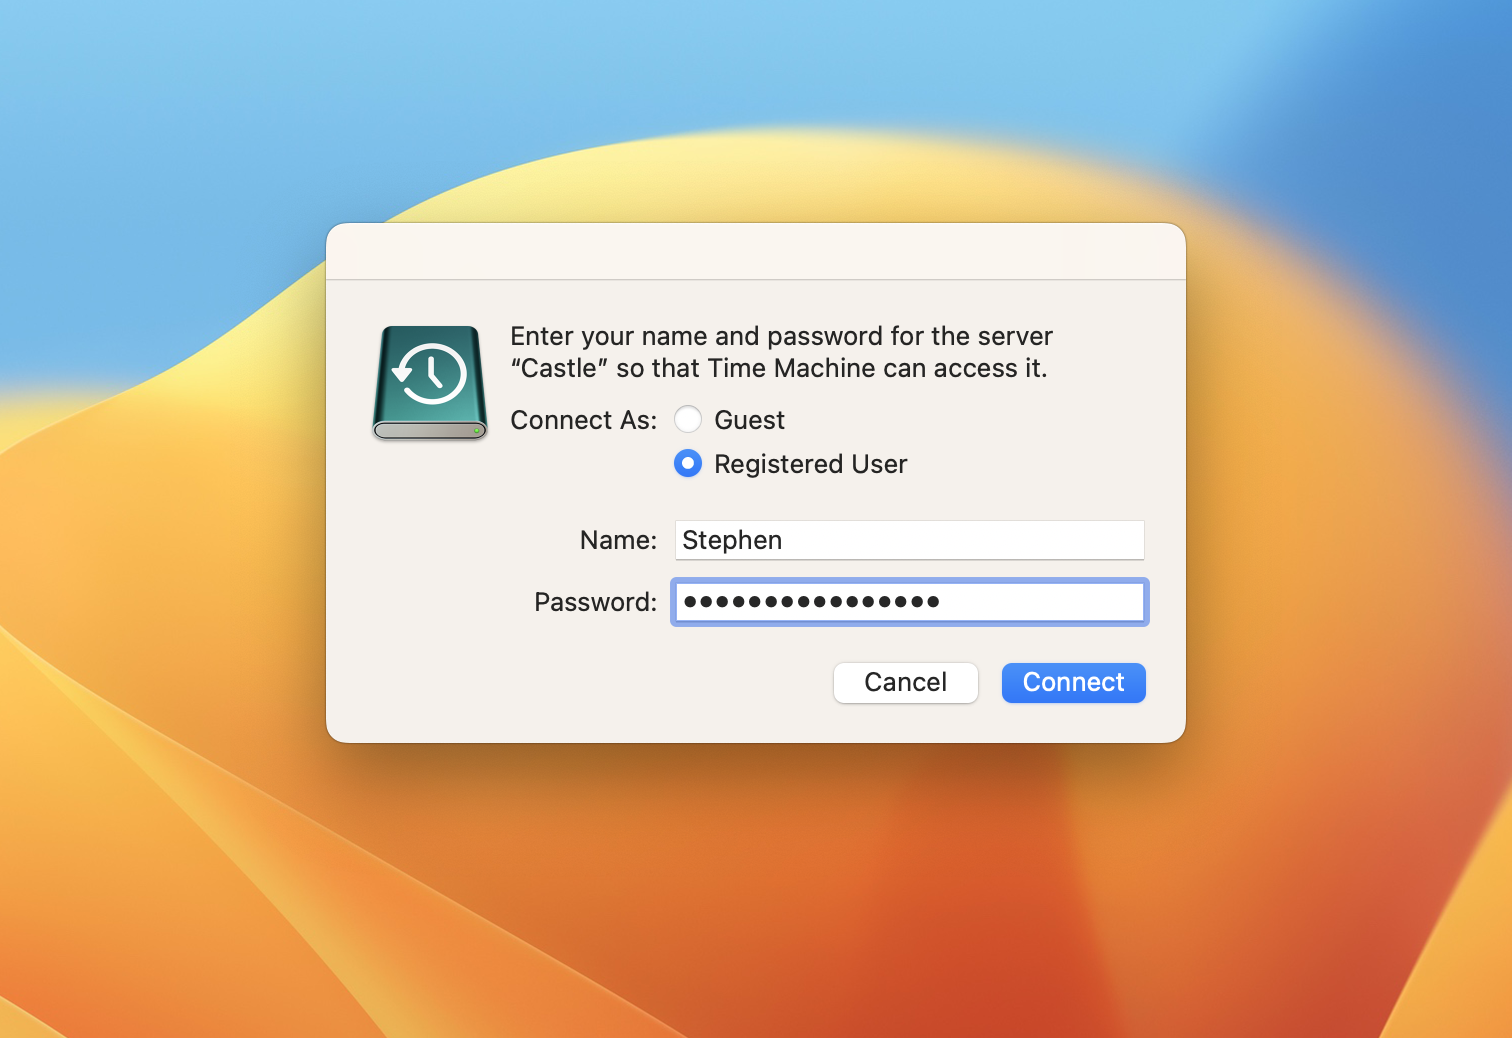
Clicking “Set up Disk…” will prompt you to log in to the remote computer with the user account on that machine:

Logging in to remote server

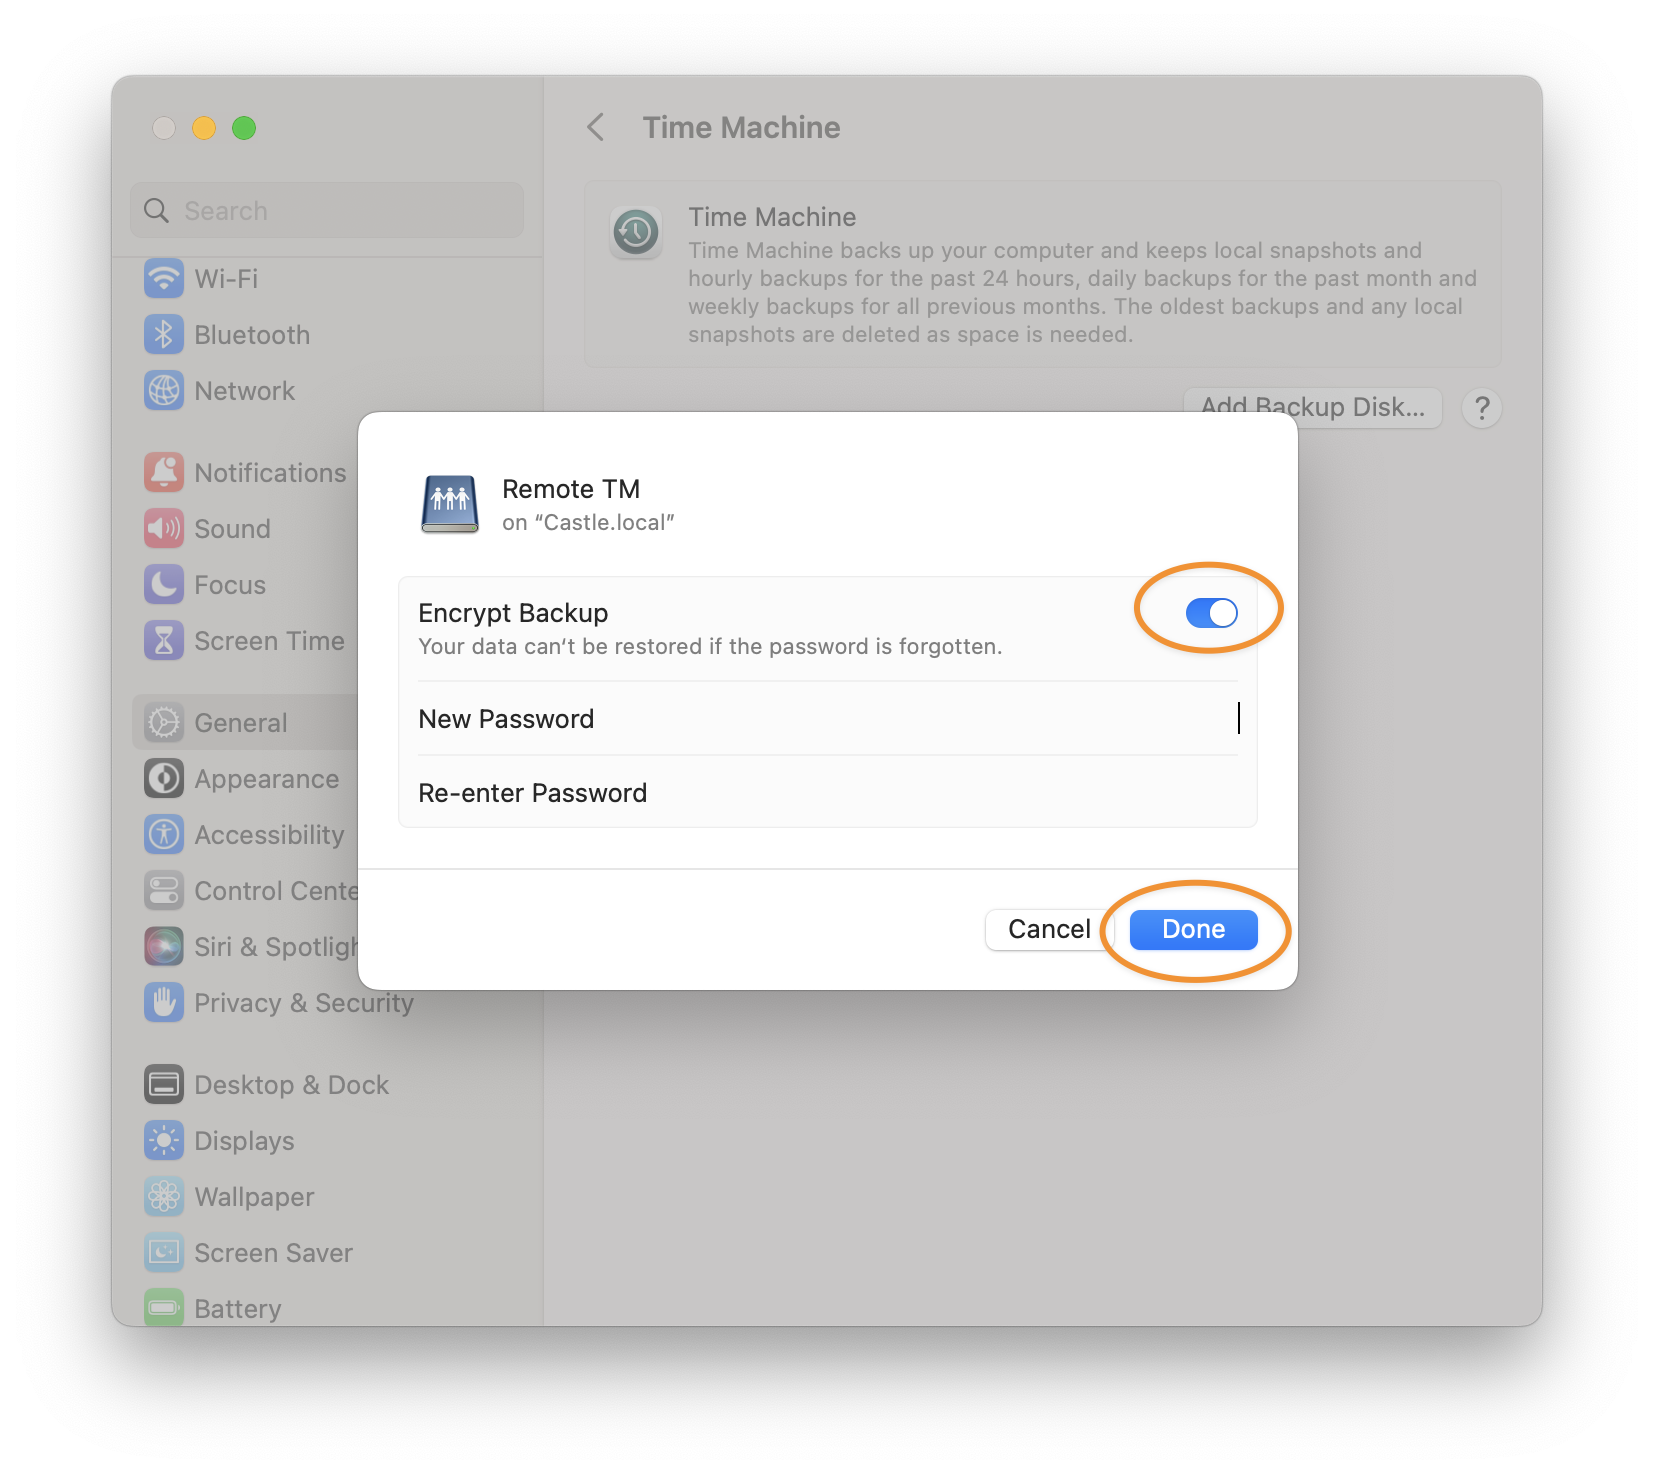
After being authorized, System Settings will present the standard Time Machine set up user interface. If you wish to encrypt your backup, set your password and click “Done.” If you do not want to encrypt your backup, toggle the slider off:

Time Machine Settings

5. Back, Back, Back It Up

You are now ready to backup one Mac to another on your local network. Be warned that this can be slower than having a drive hooked up directly to a machine, but it’s very handy for laptops that don’t have a permanent home on a desk.

Time Machine working

iTunes Movie Trailers Taken Offline

As noted by Chance Miller at 9to5Mac, Apple has pulled the plug on its iTunes Movie Trailers website and app after starting the process earlier in August.

This website had been around a long time. It made big news back in the late 1990s when it hosted the trailer for STAR WARS: Episode I. Here’s a press release from that era:

The popularity of the STAR WARS: Episode I trailer has set an Internet record with over 3.5 million downloads since it first premiered on the joint Lucasfilm/Apple web site (reachable through www.starwars.com or www.apple.com) last Thursday, March 11.

Jim Ward, director of marketing for Lucasfilm, said, “We’re thrilled with the fans’ response. Apple’s QuickTime software provided us with the highest quality and enabled us to push Internet video to its limits.”

Steve Jobs, Apple’s interim CEO stated, “Over three and a half million downloads in five days makes this the biggest Internet download event in history. Apple is proud to have participated in this online experience of the new Star Wars movie.”

Visiting trailers.apple.com now redirects to the TV app, complete with a banner that harkens back to the old site:

Trailers in TV app

Obscura 4

Version 4 of Obscura, the excellent camera app for iOS, has launched today. The update brings a revised interface, iPad support and a new business model, as John Voorhees writes as MacStories:

If you bought Obscura 3, you’ll still have access to all its features with the free version of Obscura 4, which you can upgrade to at a discount. I think the new pricing model is a good deal, and I wanted to mention it up front because it’s behind many of the design changes in Obscura 4.

The new subscription is called “Obscura Ultra,” and until September 11 is just $7.99/year. I think it makes a ton of sense for an app like this, and it’s far less of a hassle than the old “pay to upgrade to a new app” method that Ben McCarthy (the app’s developer) was using.

I love the app’s updated design, and the haptics are just next-level. If you are in the market for a professional camera app for your iPhone (or iPad), you can not go wrong with Obscura 4.